To continue my review of these rules, I took the quick start scenario from the Slitherine website and said why not have a go. In part 1 of my review of FOG-N, I discussed some of the basing issues as well as introduced the brief scenario on which I plan to play test the rules. The quick start rules are an abridged version of the ruleset, I really just wanted to see how the game worked from a mechanical sense, rather than with all the bells and whistles.
You will remember that a small French division (5000 men) was trying to escape from the Austrian army and to do so had to pass through a slightly larger Austro-Prussian division (7500 men).
Well the rules are pretty simple and they are interesting, I picked them up pretty quickly with some help from the Slitherine forum. Which each turn the nuances started to emerge.
Well anyway let's start. There are 6 phases of play: Command Point Allocation, Assault, Firing, Movement, Combat and Recovery. Remember that this is an IGO/UGO game, the scenario has the French going first.
Command Point Allocation (CAP): Each commander has number of Command Points (CP) and in this phase since this is a grand tactical game the Corps commander allocates his points to his Divisional Commanders. The number of points a commander has is dependent on his skill level and this varies between 1-3 points. The divisional commanders also have some points, so these are additional. I really did not realize the importance of this until I was into a couple of turns, but you need these points to get your troops moving, especially if they are at a Cohesion Level (CL) less then steady. Remember each unit has 4 levels of cohesion: Steady, Disordered, Wavering and Broken. In the quick start game, these are really limited as there is just a division aside, the French have 2 CP and the Austrio-Prussians only have 1 CP. They are already allocated in this scenario, so I skipped this step in the play test.
Assault (ASS!): Each unit has a set distance it can move, and if it there is an enemy unit within it's movement distance an assault can be declared. In this game French Infantry, limbered artillery and Austrian Grenzers can move 6MU (9"), Austrian Infantry can move 4MU (6") and cavalry and commanders can move 10MU (15"). Clearly on the first move no assaults were possible, so I will leave this for later. One point I would like to make though is that Steady units can assault without testing, disordered units have to test and the test is called a Complex Movement Test (CMT), and the critical bit is to carry out a CMT you need a CP. The French have 2 CP and the Austrians have 1 CP available to them each turn. So to get a disordered unit to charge you have to take a CMT (roll 2xd6, need a 5 on one of the d6 to pass). Wavering or Broken units can not carry out an assault. More about assaults later.
Firing (FIR): The active player fires first, followed by the non-active Player in each phase. (Two phases per turn). There are 3 fire ranges: Long (only for Artillery), Medium and Close. Each type of unit has a different number of dice available to it. This is all found in the Firing Table (FT). So for example, a small rifled armed unit at medium range (2-6MU or 3-9") have 5xd6 to throw, while Austrian line infantry just have 2xd6. At close range (<2MU) though the Austrian line infantry would have 4xd6, while the rifles would drop to 4xd6. The to-hit score also varies depending on both Target and Firer factors, for example the to hit score is 4+ for most situations at close range, but if the target is in square it is 3+, and if the target is in cover or skirmishers or the firers are skirmishers it is 5+. Sound complicated but it is quite simple, as you refer to just one table to decide how many die you throw and what is the to-hit score. A second table Results of Firing Table (RF) is used to see the effect of the number of hits, i.e. 1 hit no loss of cohesion, but if you are an assaulting unit and you take a single hit from the unit you are assaulting, you have to take a CMT to make contact, failing the test or having no CP to take the tests ends up with you halting at 2MU and failing to close. Two hits on a unit and they drop a level of cohesion. I found this all quite simple, and I liked it. There are plenty of more variations in the full rules (i.e. Guard units get to re-roll 1's etc), but in the quick play rules it was indeed a very simple mechanism. If an unit drops to wavering or a broken cohesion state, then you refer to another table: Outcome Moves Tables (OM). The firing process is then repeated for the non-active player in the turn. Interestingly enough an unit that fired as a defensive maneuver in the assault phase can fire again, makes for some no record keeping.
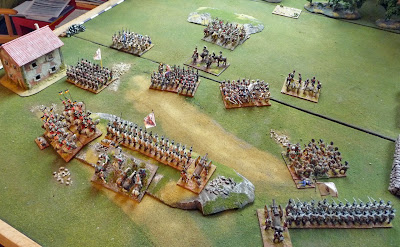
Well lets get to the game again, here is the starting set up with Austro-Prussians in the foreground on the 4x4' terrain. The two small terrained tiles at each end of the table are each division's LOC (Line of Communications). The goal of this scenario is to occupy the other LOC, thus be declared the victor.

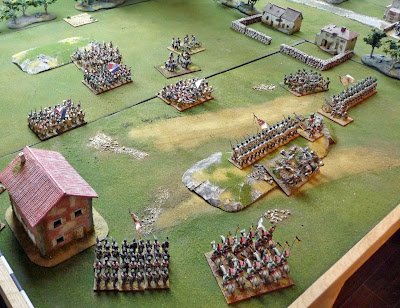
Movement (MOV): To illustrate this let's look at a turn. As it is the first turn, the phases of CAP, ASS, FIR were skipped through. The French move first. We refer to the Movement Table, all French infantry units have a 6 MU move, as these are all steady units, they are simple moves, so they just do it and advance 6 MU. The cavalry hang back, and the 13e légére climb the hill and stay at the crest (gentle hill, so no terrain effect). You can moves as many units as you want and as little as you want up to their maximum MU. Now here is the rub, you can move them a second time, but you need to take a Complex Movement Test (CMT). This costs a CP, so you can see the value of these now. The test is a roll of 2xd6, a 5+ is needed on 1 dice to pass. The artillery here decided to use their second move to unlimber. They passed and their guns appear. In simple terms first moves, counter charging, intercepting, assaulting, changing formation, wheeling, moving through friendly units, and limbering/unlimbring are simple moves. Second moves, movements taken by disordered units, moving backwards, artillery moving by prolong, continuing into an assault after being hit by defensive fire or assaulting an unit already being engaged by cavalry requires a CMT. The Austrians in their first turn advance their Grenzers 6 MU and their Jaegers and Hungarian line 4 MU. The Austrian line hold a defensive position on the hill, and the cavalry carefully move forward in support the Grenzers.

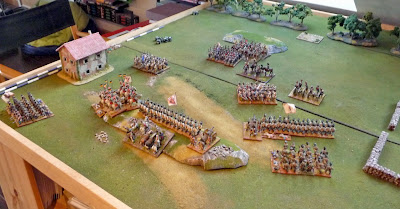
When a defending unit is being assaulted it can elect to stand at fire (at 2MU Close Range), Form Square, Cavalry countercharges unless wavering (meets at mid way point), reform into tactical from square, Artillery may abandon guns and Skirmishers may evade. Here the Austrian Cavalry are thrown back, and have to retire disordered. Referral to the Outcome Moves Table (OM), gives us the distance. A disordered unit so d6+2, a 6 is thrown so 8 MU back, but facing the enemy as the retire move is less then 10MU, the normal movement distance. The Prussian commander in the last phase of the Austro-Prussian turn recovers the cohesion loss from the cavalry, so they are good as new, but more about that later.

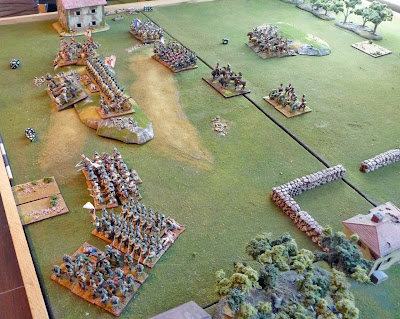
Combat (COM): Well how about combat, well in turn 3, the Austrian cavalry elect to charge the French cavalry, all steady units so no CMT required, the French countercharge and the meet in combat. I got some help from the Slitherine forum here as a number of tables had to be consulted. This is what happened. Both units have 6xd6, after referral to the Combat Table (CoT). The CoT is a little more complicated, as one has to add and subtract dice after the initial calculation. There are no additions as no one is up hill(+2d6), there is no flank support as infantry can not support cavalry(+2d6), and there are no losses as neither unit is disordered (lose 1/3 dice) or wavering (lose 1/2 dice). So 6 die on 6 die, hits on 4+. 2-3 hits each, again refer to the CoT, one CL each, both are disordered.
If I change the scenario slightly and end up with the non active player wavering (2 cohesion losses). I would go to the CRT and see that the non-active player retire units in contact and that the active player may pursue. Then again go to the OM table and see that the inactive player retires D6+4 under the wavering column. Finally I go to the Pursuit Table (PT) and see that under disordered cavalry column the active unit has to take a CMT test not to pursue, and if failed then pursues d6+2.
 Turn 4: By now the French have lost the 55e ligne to gunfire. At this point I thought the French would never win, but then I realized that it was probably a better tactic to move up close and start to fire, rather then charge. The 13e légére are advanced, they have 5xd6 at medium range so they can start causing some damage on the Austrian Line. The 54e ligne and the pied d'artelerie start to soften up the Jaegers.
 The Austrians are restive though and their cavalry decide to charge the 13e légére, the French for some reason decide to stand and fire and not form square. They pass there CT, the Austrians take a hit but pass their CMT to engage the French in tactical formation. We now refer to the Points of Advantage (POA) part of the CoT. We go through the Combat Table. The Cavalry have 6xd6, but are disordered so only get 4xd6. The French have 6xd6, but the 2e ligne are within 1 MU of the defending unit, so they get +2d6 for flank support. The Austrians have + 1POA, as they are fighting infantry not in square, so they hit on 3+, while the defenders hit on 4+.The dice are quite poor, especially for the Austrians they are defeated and thrown back yet again.
 Turn 5: The Grenzers advance but are thrown back by the French and are being softened up by the 1/54e and starting to suffer some CL. The French tactic of firing without attacking is proving successful. The Jaegers are suffering CL as well. The Prussian staff somehow another want to focus their recovery efforts on the their cavalry.
Recovery (REC): The Austrian only have one CP a turn, so they need to throw good dice, unfortunately if they want to recover an unit, they really can not advance their infantry if they are suffering CL, and their fire power is also less effective because of CL. Refer to the CT table, under Recovery tests, need a 5+ on 2xd6, they are successful, but I suspect a pyrrhic victory.
 Turn 6: The Grenzers break, the Jaegers are disrupted. French recovery efforts are in vane though and they are having some difficulty getting their troops to advance. The Hungarian advance, through the Jaegers. The 13e légere are driven back by the Austrian cavalry, but both are forced to retire.
 Turn 7: The 56e ligne charge the Grenzers who evade, refer to the OM Table, they retire d6+4, and throw a 6, they are turned around (exceeded their normal movement MU) and retreat in disgrace broken. The 54e ligne and French Artillery pound the Hungarians, they are wavering.
 Turn 8: The French artillery crush the Hungarians and they retire broken. The French are finally advancing. The Austrian Cavalry is wavering, as well as the Hungarians, the Jaeger are broken and in retreat. The Hungarians rally but are spent.
 Turn 9/10: The French wheel their artillery, and now the Austrian line are wavering. The French advance is unstoppable, victory is inevitable as the 54e approach and take the Austrian LOC.
 Well, I have left out a lot what happened in the AAR play test, but I have gone through the basic mechanisms of each phase, within the hope that I have successfully illustrated the basic play.
So my thoughts:


Recovery (REC): The Austrian only have one CP a turn, so they need to throw good dice, unfortunately if they want to recover an unit, they really can not advance their infantry if they are suffering CL, and their fire power is also less effective because of CL. Refer to the CT table, under Recovery tests, need a 5+ on 2xd6, they are successful, but I suspect a pyrrhic victory.


So my thoughts:
- The book is a little wordy, but once you get the hang of the tables, the mechanism is elegant and simple.
- I would find it difficult to play a game from the quick play rules only, reference to the book or the forum is probably necessary, I hope this post may help.
- You can go through turns very quickly, minimal dice required and tables are logical.
- The terrain looks good, with a Corps aside this would be an attractive looking game.
- No Record keeping!, only need some way to mark the CL for each unit.
- This is only the quick play, so there is a lot of depth not discussed.
- Left out is troop quality, type and terrain factors to name a few of the missing aspects.
- The Command Points are critical to play, especially once you suffer cohesion loss. I suspect at the Corps level with multiple divisions, the CP allocation really makes this game Grand-Tactical and challenging. Multicorps games would be a blast. The player in command would really have to think about who he is handing his CP's to each turn.
- Use solo mounted ADC's for CP markers, move them about each turn..,would look very cool.
- The forum is quite helpful, and there already appears to be a critical mass of players, unlike some other recent rulesets.
- The game was a lot of fun.
- I suspect it might fill the gap of grand tactical gaming, that I have been hoping to fill with Blucher.
- I certainly will play it again with some larger historical battles which I have not been able to play because of the number of figures required.
I am sure I have made some errors in the gameplay, any corrections are always appreciated.
(58645)
Enjoyable and informative thanks John.
ReplyDeleteA great read, they do sound like a very interesting set of rules. I'll have to introduce Postie to the rules, they look like they could be a lot of fun. Thanks again for the info, its greatly appreciated!!
ReplyDeleteThanks for the review John. I was tempted to try FOG for a now-stalled Crusades project. But I was put off by the Long playtime, which I hear is about 4 hours.
ReplyDeleteI don't have anywhere near the minis needed for FOG-N!
Superb Review - I really appreciate the effort you put in to write such a thorough review - well done.
ReplyDeleteI really like how the command point system seems to work. Games with some form of command friction really appeal to me and this seems to do a good job without being too random.
Miles
Happy to oblige, I do not think that there are any more major Napoleonic rulesets in the offing, so I am relieved. I will try to focus on FoG/N (Grand Tactical),BP (asymmetric tactical) and Lasalle (symmetric tactical) and maybe a foray back to Field of Battle (like the cards). How is that for a plan.
ReplyDeleteJohn
Well, it seems your review might change my mind about the rules, Thanks for your work
ReplyDeleteVery thorough review, John! Thanks for this. By what you describe I really like some aspects of the rules. (The Lines of Communication mechanism sounds very interesting) I'll definitely pick them to get some ideas.
ReplyDeleteCurt
This review is excellent; very in depth and I really appreciate the battle you fought - thanks.
ReplyDeleteI have given away my FOG Nappy as I found them dry and frankly designed for competition play. The pictures of your game look excellent but have the feel of a battalion game still, that is down to the rules not you of course. I hope you enjoy FOG Nappy - we're sticking to General de Brigade.
Cheers
warpaintjj
Well done on the write-up. My first impression was of a ruleset lost in jargon. Seemed like a lot of work to roll d6's. I'll stick with Lasalle for now, and some V&B if I need a grand tactical fix.
ReplyDeleteDon
Even though FOG rule sets are not to my taste as I find them dry as well I really respect the effort you put into this post and find it an excellent review. Others I'm sure more open minded to FOG then myself will find this very interesting indeed. Very, very well done and nice table as too!
ReplyDeleteChristopher
Great work on the review-thanks.
ReplyDeleteFor a highly interactive battalion based game try Drums and Shakos Large Battles. They are a very interesting game and not at all hard to get into.
Many rules are dispensed with due to the use of failed active player command rolls potentially generating activity in you opponent's army.
You can buy a cheap digital copy so you might want to consider them.
Regards
Happy W
Hi John.
ReplyDeleteI just played the same scenario myself. I feel the game will be much more enjoyable once played as the 'full' version. I'll be playing a full version on Sunday to test the theory. French and some allies V Prussians, 1813.
Thanks for the review.
cheers
Firing (FIR): The active player fires first, followed by the non-active Player in each phase. (Two phases per turn).
ReplyDeleteI think this may be wrong based on what I read in the QPS- I think it is mor elike Lasalle you, move, they fire, then you get to fire.
I am quite confident that I have it correct page 20 rulebook, "Both sides get to fire their units in this phase."
ReplyDeleteIn order to write the above play test, careful reference was made to the rulebook. I tried to limit the level of play to the quick play rules.
John
Thank you for both reviews. I have just bought the rule book so I was able to see how the game plays. Quick play and no removal of figures. Looks easy to convert for 6mm and 12 mm figures. Aberdeen Wargames Club hardly plays Napoleonics any more, but a few members Play FOG Ancients. Hopefully this will rekindle the interest. Many thanks. N
ReplyDelete