26 May 2021

Gembloux Gap-Blitz on Villeroux (3)


We had the next game in our Gembloux Gap campaign last night, this time utilizing the Blitzkrieg scenario from the 1940 source book for Chain of Command. Until now the Germans have been doing well, but I felt that this game was going to be a difficult one for them. They are racing essentially against a clock, but things really did not go as expected as you will see.

Here are some pre-game photos of the terrain for this scenario. I find it difficult to remember to take photos during the game although this time I did take a few.


Dice were rolled and the game started:

Germans (FM 9) (3 Schützen Regiment)
Schützen Platoon #1 (less 2 men)
Supports (18)
IG 18
Jean-Claude
MMG Team
Red Dice
PzIV
Pregame Barrage

French (FM 8) (110e Régiment d'Infanterie)
Infanterie Platoon #2 (new)
Supports (9)
Pregame Barrage
Canon de 47mm L53 ATG
Anti-Aircraft Artillery

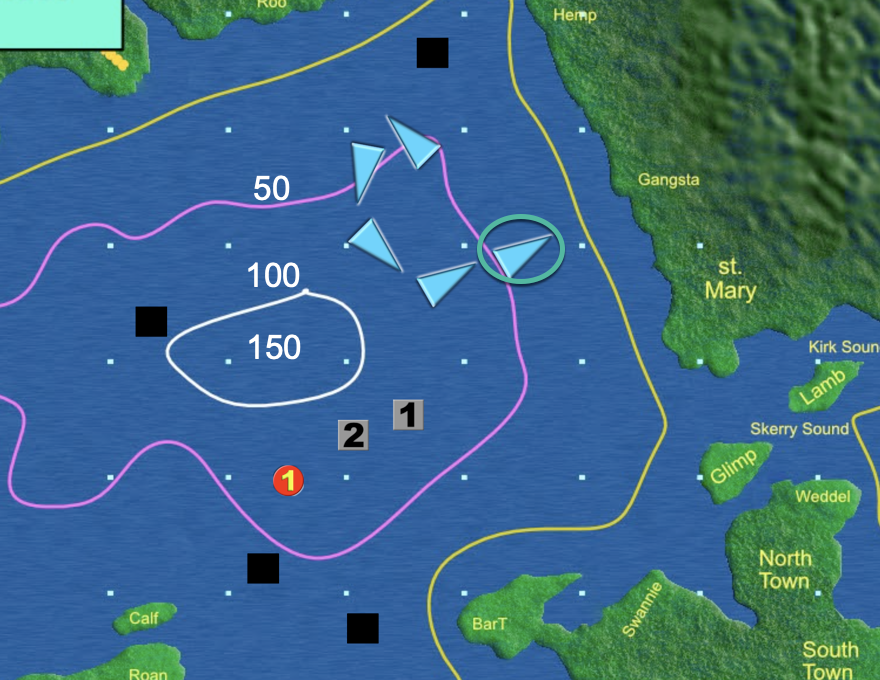
As usual we played out the Patrol Phase on P-Y's brilliant ap. The smaller dots are the JOP's, while the numbered dots are the PM's at their final positions. 

The Action

My plan was to use the PzIV to threaten the southern approach and try to get off the table by initially travelling south of the wall in the east and then going to the road in front of the garage in attempt to exit the western edge. I strongly suspected the P-Y would take an ATG which he did, so I also set up a squad in the southern forest to try to make a run for it in the south as well as 2 squads in the northern forest to make a run for it there. I also set up my IG18 in the forest to the north facing south west in order to cover them. This final placement did not work well as I do not believe it had a target for the game. 

P-Y placed his ATG at the intersection in the road and cleverly placed a squad to the south just outside of 4" of the forest making it extremely difficult to move within firing range without engaging in combat. This really flummoxed me, and I eventually had to withdraw back. P-Y was unlucky in accumulating CoC dice to end the game and I believe the most he had collected was 9 pips. Early on I had a CoC dice that I could utilize at any time to reduce his CoC dice.

He was able to take out my PzIV by immobilisation mid way through the game. At this point I could see that I was probably not going to win the game except by reducing his FM to zero. I switched my plan to one forcing the French to take as much attrition as possible and then withdrawing. By now the game was well into the 4th hours and it was getting late. The French had their 2nd platoon on the table and I still had my first so I could afford to take some losses. I would have more support in my 2nd attempt to take this table, we were only in turn 3 and I was on table 3 and if I was successful the French would have a weaker force with which to defend on the 2nd go. P-Y had a routing unit with 2 officers so after a lot of back and forth, I ended the turn and the withdrew from the table.  I probably could have stayed the course and hoped for a win by FM as when I withdrew I was at 4 and the French were at 3. But at the same time, P-Y played quite a good game holding my infantry off in the south and the north.

A French victory but hopefully somewhat of a Pyrrhic one! 

Photos taken during the game. 


Butcher's Bill

Germans (platoon 1)
11 men killed
5 dead, 3 missing (now 6 dead, 3 missing)
CO +1
MO +2
Guarded

French (platoon 2)
12 men killed including 2 officers
6 dead, 4 missing
CO +1
MO -4
Content


Drive on Minsk-Game 4, Session 3

Another game in our Drive on Minsk epic is documented here, a lot of actions and the Soviets are on their heels!

23 May 2021

UBOOT-Patrol 16

I missed this game, but it sounds like there was a ton of action.

PATROL 16


After successful HIT and BOOM on the labship, Captain holds quick conference with Officers and decides to fire remaining 2 torpedoes to the warship in anchor. 

Both torpedoes HIT and EXPLODE with devastating noise and rumble… the old watery warhorse is not likely to come out of anchor any time soon... 


but the enemy does not just sit by quietly… hydrophone reports fast MOTOR TORPEDO BOAT approaching from direction of Hoxa Sound… UBOOT dives to 50 meters and Captain decides to circle around with evasive maneuvers and head out through Hoxa route, the way we came in… 

well, not so fast, says the enemy… UBOOT gets tagged by several fast MTB which drop a single depth charges every now and then… in addition 2 Corvettes with proper depth charge racks enter Scapa Basin and start PING-searching UBOOT, cross-scanning from different directions and no doubt using their radios to synchronize observations…


in addition 1 Destroyer enters the Basin from direction of Hoxa Sound…

BLACK = MTBs, 1 and 2 = CORVETTES, RED1 = Destroyer

Captain orders torpedoes to be loaded, and 1 torpedo manages to find its way into forward tube until UBOOT is forced to start maneuvering and loading is aborted…


Captain considers the idea of trying to reach the deepest 150m center area and laying low at the bottom… but that is not going to happen, UBOOT is forced to maneuver itself toward Gansta shoreline, where Captain settles the boat at the bottom at about 35 meters of depth… shut down engines… minimize noise… and wait…


Enemy keeps PING-searching the basin but since UBOOT is stationary at bottom, they cannot get proper fix from movement. Enemy keeps dropping depth charges, quite a few around the deepest central area which would be logical place to hide… they also seem to get some idea about the shoreline because MTBs and Corvettes make couple of passes and drop depth charges close to the UBOOT location if not exactly on top… depth charges seem to have been set to explode around 50 meters of depth, which is logical considering the Basin environment. UBOOT at 35 meters is not exactly the most critical  level … 


but still few close shaves create results:


twice the blast shockwave hits against the outer hull, first HULL DEFORMING result  brings maximum depth diving level to 130 meters, crew can hear the hull creaking and moaning as the metal bends under pressure but it holds… another similar HULL DEFORMING result brings the maximum diving depth to 65 meters, but still the hull holds… one blast knocks out the lights and electrical circuits in the Control Room - Watch Officer turns on emergency lighting adn Control Room bathes in red light...

one really close hit created lots of noise observations from deck outside: by the metallic noises it sounds like the 20mm AA-gun took a bad hit, propably not is any usable condition, might even be loose from its mounting… pressure from one explosion damages the hatch on #1 torpedo tube which remains unusable for now, but repairable.


Hull damage cannot be properly assessed until UBOOT can surface and crew can get outside the boat to check it out. Repairing the hull damage will require dry dock conditions at harbor. At least UBOOT is still operational. At the moment 1 torpedo in forward tubes, 1 torpedo in rear tube, 2 more in storage… all torpedoes are bubble torpedoes.


All together, enemy dropped around 100 depth charges, most of them around the central Basin area with no threat to UBOOT, approximately 25 bombs were dropped somewhere around the vicinity of UBOOT.


Apparently enemy did not get a verified fix on UBOOT location. After somewhat 2 hours the depth charging stops. Hydrophone still reports lots of propellor noises and vessel movements and PING-searches around the Basin area, even patrolling shoreline with fast boats… around midnight the traffic seems to quiet down… at few minute intervals you can hear several PINGS from multiple directions, now these PING-sources are not moving, they are stationary … most likely enemy has places sonar buyos into water around the Scapa Basin and the outgoing main routes, they will feed signal changes into central radio receiver somewhere in the area.


Around 0200 in the morning hours, hydrophone reports increased smaller vessel traffic FROM harbor area AND from few locations on the shoreline, TOWARD both Hoxa Sound and the Western route. Even a distant low rumble of larger aircraft taking off can be heard. By 0300 the Basin area is totally quiet - except for the multiple PINGS ringing out at steady intervals.


Captain has decided to keep UBOOT down at sea bottom for rest of the night and through the next day and into next night.


16 May 2021

Gembloux Gap-The Culverts at Noirmont (2)

This past Tuesday we had our 2nd game in our Gembloux Gap campaign. This game had a quite a bit more action than our first. What was fun, was that the game was based on the "Going with a Bang" scenario from the Blitzkrieg source book, one of my favourites. Essentially the French have to blow 2 culverts one in the west and one in the south before they retreat from the table. If they do the campaign advances 2 turns, thus making a significant German victory less likely.


Here are some photos of the terrain I set up before the game.


We were again joined by my Finnish friends despite the game starting again at 0200h Helsinki Time. 

Dice were rolled and the game started:

Germans (FM 10) (3 Shützen Regiment)
Schützen Platoon
Supports (12)
IG 18
Jean-Claude
Stuka
Red Dice

French (FM 11) (110e Régiment d'Infanterie)
Infanterie Platoon w/demolition team
Supports (6)
Sniper
Pregame Barrage
Demolition Team


The Action

We played the Stuka phase and 2 buildings were taken out but neither was on the forward line of defence, I was really hoping to take out the garage or the white house to the north. There were 2 UXB's, but again not in a place to threaten anyone in the short term. 

P-Y started the game as he had the higher FM. He was keen to lay down his defence early in the game. An infantry squad suffered 3 shock coming in and then it was my turn, I threw three 6's, so much for the Stuka attack! P-Y's focus was certainly to take out the southern culvert as quickly as possible, so he placed another squad in the south with his V-B team. He also placed a sniper in the garage to harass my deployment. 

I had decided to focus half my forces in the south along the hedge east of the garage and half in the north in the forest. I felt that I really had to advance 2 squads as quickly as possible along the northern edge of the table to counter the 2nd French demo team when they deployed to take out the western culvert. A SL was going to go down both in the south and the north. 

In the south, I placed a IG18, an infantry squad with  Jean-Claude. I also placed my 50 mm mortar team with LOS to both the north and the south. P-Y almost took out the southern culvert, but I was lucky with double phases and was able to overpower him there and his Demo Team broke. I was taking some fire so I took my infantry squad and IG18 out of LOS, they had done their job. 

I was curious at this point what P-Y would do, would he place his 2nd Demo Team in the south to have a 2nd go? I needed to distract him, so the 2nd infantry squad went down in the forest, they both advanced towards the infantry squad protecting the JOP just southwest of the White House. I also moved the IG18 to a point where it had LOS to the north. Another double phase, not much a single squad can do against 2 German squads firing at close range. They were chopped up and at this point P-Y withdrew. Another German victory. We missed that if the French take out one culvert, the Germans do not get vehicles for the next game. I felt it would have been quite easy for him to take out the westerly culvert though as I was still quite far away, so we felt it only fair to say that this had happened.

Photos taken at the end of the game. 


Butcher's Bill

Germans
2 men killed
1 dead, 1 missing
CO +2
MO +2
Droll

French
8 men killed
4 dead, 2 missing
CO -1
MO -1
Sad


15 May 2021

Drive on Minsk-Game 4-Session 2


Eero has just put up the latest report in our large scale Battleground Command game on the Wargamer's Forum. Lots of action in this one! Our next meeting is this Tuesday morning so stay tuned. 

11 May 2021

WaC Campaign-Vendetta


Last wednesday, we returned to the Wild West. P-Y now had his massive saloon complex printed and painted, so we decided to play our next game in town again. I was expecting that we would fighting within this massive building so I equipped my posse with short range weapons aside from one character. We decided however it would be pretty tricky to do this over the internet, so no inside of the building. We diced and I ended up being the attacker. I secretly had to pick one of the Sheriff's Posse on whom I would focus my efforts. I went Elmer "Two Lives" Pratt, a Gunslinger. We went with a modified reputation reward, 4 for a Legend, 3 for a Gunslinger, 2 for a shootist and 1 for a Greenhorn.
I chose the right side of the above photo as my start point, you can see my 3 mobile deployment points (white dice). P-Y placed his fixed point on top of the saloon.

Mexican Banditos

Tuco-Legend-Outlaw-Adams Revolver, Winchester Carbine-Deadeye, Stealthy-Shoulder Stock, Spy Glass
Angel Eyes-Shootist-Ex-soldier-Wincester 1-1000, Colt 45-Rifleman
Le Français-Shootist-Merchant-Sawn-Off ShotgunColt 45-Slow, Ice Cold
3-Fingered Julio-Miner-Colt 45

Sherriff's Posse

Robert "the Savage"Cain-Legend-Ex-Outlaw-Adams Revolver x 2-Quick Draw, Ambidextrous- Shoulder Stock x 2, Spy Glass
Elmer "Two Lives Pratt-Gunslinger-Ex Outlaw-Winchester Carbine, Shotgun-Lucky-Telescopic Sight, Spyt Glass
Moses "the Viper" Rivera -Shootist-Buffalo Hunter-Winchester Carbine, Colt 45
Herman "the Mute" Elliot-Shootist-Ex-soldier-Colt 45, Sawn-off Shotgun-Tough, Deadeye

Supports:
Mexicans: Henchman, 3 Mobile Deployment Points, 
Sheriff: Henchmen, Fixed Deployment Point

So our game started, P-Y almost immediatedly placed Elmer on top of the saloon on his fixed deployment point, he also brought on the rest of his characters in the first turn. I decided to hold off and for the first couple of turns held off deploying anyone aside from my Greenhorn. I had planned to use Angel Eyes to take out Elmer, that is why he had the Winchester 1in 1000 with it's extended range. This did not work out to plan as the only building where I would not be shooting up was the tallest building, 2nd from the left edge in the above photo. I planned to use Tuco as a backup, using my other 2 chartacter and the henchmen as distractions. With this in mind, I started to move 2 mobile points towards this building and the other towards the hotel. I do not believe I deployed my other 3 characters until the 3rd or 4th turn. I was eventually able to get Elmer on the roof and Tuco between the 2nd and 3rd buildings (the ones with the rail track behind them).  I was able to move Le Français to the balcony of the red bank. There was then quite a bit of firing back and forth certainly the civilians got overwhelmed. I believe one of them killed one of the Sheriff's henchmen. Tuco was able to get a critical on Elmer, thus he became quite weakened. 

By now no one was dead but the Sheriff's men were shot up while all the Mexicans were in good shape. P-Y could see the writing on the wall and withdrew. Two Mexican victories in a row with lots of reputation points all around, I did not get the 3 reps for killing Elmer but it worked out ok as now Angel Eyes is a Gunslinger! 

Now for some photos.