30 August 2015

Boston Trained Bands Gamesday: The Road to St Lambert


I GMed my first game yesterday at the annual Gamesday for the Boston Trained Bands held at the Hobby Bunker in Malden, MA. I think there was around 16 games, they all looked great. There was one trench wars game that looked amazing, enormous amount of work must of went into the terrain.

As usual, I was unable to resist playing CoC, and as there were 3 different CoC games it was quite easy to find one. Eureka Miniatures US held a demo CoC game and there was another US vs Germans game held by Austin a gamer from New Hampshire. I elected to play the latter game as the participants were all seasoned CoC gamers. Through this game I met 3 other CoC gamers, Al, Tom and Chris all from central Massachusetts. It is really striking how many gaming clubs there are in this area and how many CoC players there are. It is also interesting that unlike myself these were all very seasoned gamers (I suspect 30-40 years of gaming each) and really the constant refrain was CoC is one of the best rulesets they have played. Anyway both these morning games looked great and had the full complement of gamers signing up for each.

The game I was doing was in the afternoon, one player who had pre-registered did not show up but his position was rapidly filled by Nick, a novice to CoC. I also met Greg from Southern New Hampshire another seasoned CoC gamer. With the above mentioned Chris and Austin this made my task very easy. Chris, the most experienced CoC gamer at the table, was paired with Nick. They took the Germans while Austin and Greg took the Canadians.

As previously discussed the scenario I put on was from the Falaise Gap campaign in August 1944. I made some modifications to the OB for a 4 player game with an added Section/Squad to each side as well as 2 senior Leaders per side. I felt this would be a little simpler than playing Big CoC. Otherwise the scenario was unmodified.


Modified from http://playingtheodds.com.au/crossroads-closing-the-gap-campaign/ Permission to use.

On to some photos:
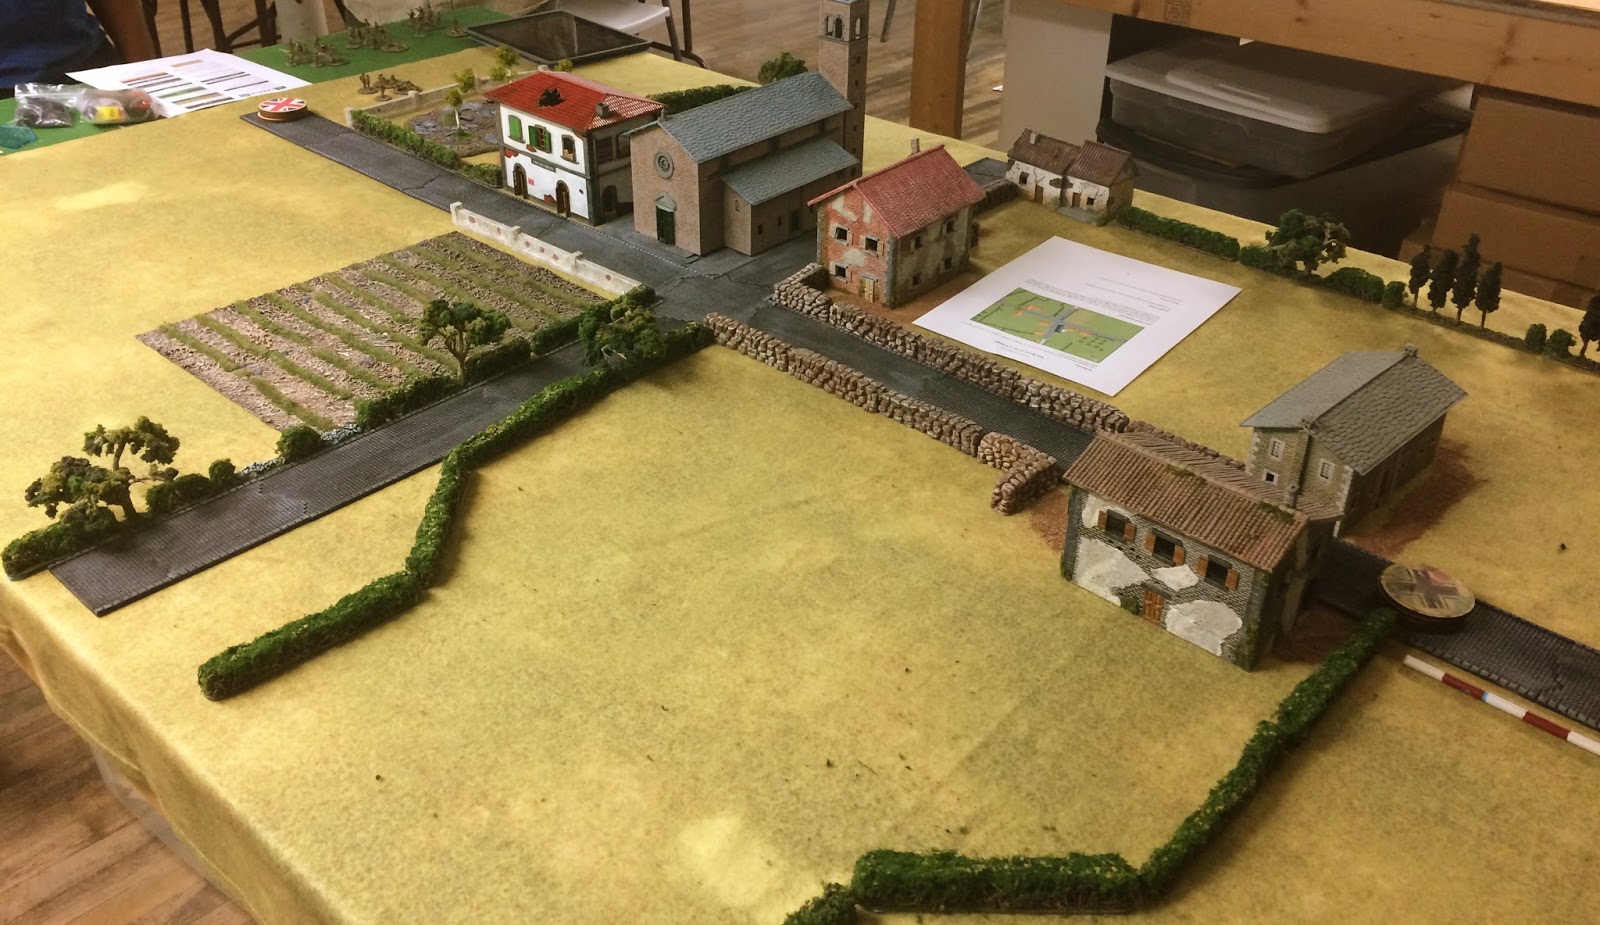
The Patrol phase as usual produced it's usual gyrations with the sticks, I think I will move to lasers. There was some complaint from the Canadian players about the lack of cover in the on their right flank, but of course that is the scenario design. No reason to make it easy for the attackers. As you can see the Germans were more successful in this stage of the game. The Canadians had all the JOP's on the left side of the road, while the Germans were able to spread their 3 JOP's on both flanks with one well advanced on the road. 
The Canadians were able to place a sniper in the belltower, giving them excellent LOS over the whole terrain. 
The Canadians advanced 2 sections rapidly on their left flank and got into position to cross the road to advance on both their right and on their left. It seemed like a good strategy.
This section is now well more than half way to their objective (to be within 12" of the German table edge), so just 2' to go! 
The Germans place their Panzergrenadiers in stone house, but the Canadians responded by throwing down some smoke. Neither of the players had played British before, this is seems pretty typical in this part of the US. They are my favourite troops to play as I like the tactics of laying down smoke and  advancing.
The Germans kept their troops well hidden until the Canadian path of advance was more obvious. 
By now they have their field Mortar firing, and 2 squads on the table but none really visible to the Canadians aside from some in the stone house to the left in hard cover. 
The Canadians get across the road but take some losses including their JL being wounded. The Germans have now planked down a squad entrenched in the road and start firing at the sniper after his position was identified while they were on overwatch and he took a shot on them. The Canadians have placed their paratroop section (a bit historically incorrect) on the road in the farground with plan to advance rapidly on the German right flank. The previous section in the road has now occupied the the stone building across from the church, but seem unable to get in good position to fire at the entrenched Germans in the road. 
Beware the double 6. By now the Canadians had smoked the centre obscuring all fire from both buildings on the German side. The Canadian paratroopers then hopped the wall and started their advance to the "goal line". Unfortunately the entrenched German team was able to take out the sniper as well as kill the JL leading the team on their right flank, thus stalling their advance on that flank. They had both SL's on the other side of the road which was no help. The German turn comes up and they throw the first double 6 of the game, they are able to deploy their reserve squad and rapidly advance it within close range of the paratroopers and mow them down on their second activation. By now the Canadian assault had lost cohesion, and they decided to retreat. I believe this was the prudent option, especially if this was indeed the first scenario in a campaign.

So all in all I think it went pretty well, I think the only major dispute was whether a sniper could provide LOS for the on table Mortar team. Clearly the rules say so but I think this is probably not very correct as you can see by this discussion on the forum. It was a strange game that only one double 6 was thrown, no CoC dice were generated and thus it lasted just one turn of multiple phases. I believe both sides had the correct strategy to win the game, but the Germans were a little more adept at carrying out. It would have been nice for the Canadians to have had a SL on each flank, and maybe they should not have advanced their paratroopers until they had an CoC dice in hand so they could have interrupted the Germans with their superior close range firepower. I would like to play this game again.

16 August 2015

Chronica Iohannes: The Battle of Fyrmæl Slæd

Myself and Adam got in a much delayed Game in our Dark Ages campaign the week before last. The Britons had the Saxons on the run in the campaign so this was going to be one of those final big battles. By now we both have expanded our war bands and decided to both introduce cavalry to our forces.

Adam has the usual excellent action report on his blog the Fencing Frog. The terrain was laid out as a forest with many open smallish meadows. I converted one of my elite units to shock cavalry as per the Dux Raider supplement rules and we decided to allow the Saxons to convert one of their warrior units to light cavalry. The battle was initially fairly even but as it progressed I came less cautious then I am usually (maybe due to working until 3 am the night before) and really pressed my troops in. Well I ended up with my worst result ever losing I think 42 men, one noble captured and one killed giving Adam an astounding 7+ victory.

A siege then ensued and just by the skin of my teeth was I able to challenge the siege in October 555. We have gone through 5 years of history and are enjoying the campaign still. We play our next game in front of the gates of Caterick next Thursday. It should be a good one.


On Other Fronts:

I have really done a lot of painting recently especially with WWII armour and terrain but seem to have transiently lost interesting in photographing things. Hopefully this will soon pass as I have lots of work to exhibit.

I am looking forward to putting off my Falaise Gap CoC game in a couple of weeks at the annual Boston Trained Bands game day. I was involved in CoC game yesterday at the Hobby Bunker, which was somewhat personally challenging in respect to my knowledge of the rules. After some review on the TFL forum, I am hoping to be well placed to GM the game.

02 August 2015

CoC: Closing the Falaise Gap, The Road to St Lambert

I had my first game of CoC in quite some time yesterday. This was a test for a game I am presenting at the Hobby Bunker/Boston Trained Band Games Day on August 29th. Mike kindly travelled down from NH to help me test the scenario.

I used the first scenario from an excellent privately published campaign booklet Crossroads: Closing the Gap. I recommend this campaign without reservation. Click on the link and you will see a full description of the campaign.
In this scenario the Canadians have 8 supports and the Germans 4. The choices are quite limited by the campaign. Mike elected to be the attacker, he chose a 3" mortar, a 2" mortar. I am not sure what his other 2 points were. As the defender I picked a sniper and entrenchments for 1 team. The Germans started with a morale of 8 and the Canadians a morale of 9. The Canadian base line is to the left and the Germans to the right. The red circles are where the Canadian JOP's ended and the blue are where the Germans ended up. The objective was for the Canadians to get within 12 " of the German edge.

The terrain was fairly open with plenty of hedges, walls and buildings. The hedges and walls were all soft cover and medium obstacles. The building were all hard cover. 


So here we have the game underway. I placed my first squad behind the hedge and then advanced them into the open. A little chancy, but the hedges blocked LOS until you were within 2" of them and the Canadian JOP on my left flank was well back with two intervening hedges.
The Canadian section however were able to advance fairly quickly. Each unit is still out of LOS, which is slightly different then described in the rule book but correct according to the campaign. I think this will work well for a participation game. I also had placed my sniper in the building to the top left of the photo. This was quite successful initially but I forgot he was there after a while to my subsequent detriment.  The Canadians continued their advance to the leading hedge and started to shoot at the squad in the open. I took shock but in my next phase a double 6 came up and I had a CoC dice so  I was able to subsequently ambush this section with an LMG team as well as fire with the squad. 23 d6 made short work of this Canadian section and I was then able to advance this squad to my right flank and start to make their way down the road. The LMG team was kept on the table and drew back behind the building to cover my centre and right flank as now there was no real threat to my left.
A second Canadian section is skulking behind the building while the 3rd section was in the church. Mike was able to use the buildings to his advantage. You can not see them but to the right is the German squad that just took out the Canadian section in the road covering the intersection. This covered this approach quite well.
I was able to protect my right flank with a squad in entrenchments, they were kept on overwatch. The Canadians certainly stayed away from that edge, but subsequently made their way through the gap in the 2 buildings. I also popped my remaining rifle team to their rear to act a back up to this squad.
We can see this action here. By now the Canadians have got all their supports out and are bombarding the centre with both heavy mortars and smoke. They were essentially able to immobilize the squad in the road causing them to be pinned and lose LOS. This allowed the Canadian section in the church to advance to my front with their third section while the second section who had been in the road made their way around the building and started to fire. This well entrenched German squad was now taking fire from two Canadian sections and were starting to take attrition despite being in hard cover. A double 6 came up for the Canadians, they were able to fire yet again without retort and then sent in one of their sections to assault the German squad and despite having a slight advantage in d6, the Germans lost all 5 remaining men with their JL and while the Canadians lost 4 as well as their JL. The Canadians were down to a Morale of 5 while the Germans were still at 6.

My troops in the centre and in reserve were still pinned by the barrage, I was able to end it but on the next turn Mike again got double 6's and was able to quickly restart the barrage and again hit right on target without an aiming shot.. My SL, the sniper, a full squad as well as an LMG team were all again caught in the barrage with just one German rifle team free.  The attrition started to pile up with the continued barrage so we decided to call it quits with a marginal Canadian victory being declared. I had no CoC Dice pips and it was going to a grind.
I must say it was quite an enjoyable game, and I think if I had not forgot about my sniper, I could of probably taken out the Canadian FO and won. I think it will be a good participation game and am looking forward to it. Mike suggested that I not have the 3" Mortar as an option of support but I will have to think about this.