
29 September 2009

19 September 2009
Wavy Flag Tutorial
I like a wavy looking flag and I just could not get the effect I wanted from rolling the flag. After looking at the Flagdude style I decided to try to micmic it. I had a bunch of GMB flags, so adaption was required.
 (6456)
I cut the flags and use a glue stick.
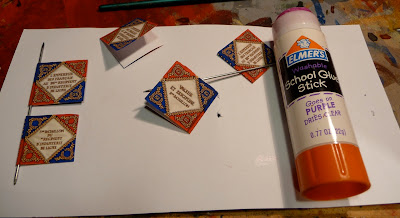
 I attach them to rigid poles temporarily.
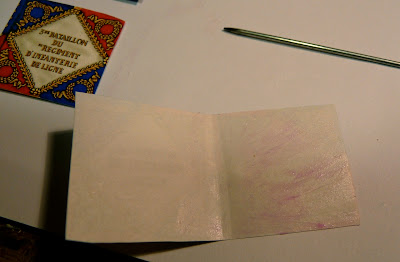
 And soak in some water for 30-60 seconds.
 The tricky bit is scrunching them up, as you can see the paint is slightly cracked in the upper flag. You have got to be careful.
 Let them dry standing up, I wait at least 12 hours.
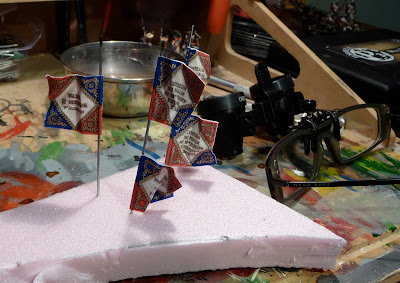 I then slide them off the wires and slide them on the already attached flag poles. Use a tiny bit of super glue to attach them.
 I then paint the edges (GW enchanted blue and blood red are good matches for GMB french flags). Attache the points (I can not find my Front Rank eagles which is pissing me off) and I think you have quite a nice effect.
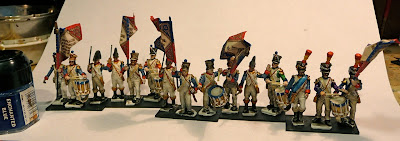
Le deuxième bataillon/82e Ligne command group
 I attach them to rigid poles temporarily.
 And soak in some water for 30-60 seconds.
 The tricky bit is scrunching them up, as you can see the paint is slightly cracked in the upper flag. You have got to be careful.
 Let them dry standing up, I wait at least 12 hours.
 I then slide them off the wires and slide them on the already attached flag poles. Use a tiny bit of super glue to attach them.
 I then paint the edges (GW enchanted blue and blood red are good matches for GMB french flags). Attache the points (I can not find my Front Rank eagles which is pissing me off) and I think you have quite a nice effect.
 (6456)
14 September 2009
Terrain Table: Roads 2
Looks a mess after the yellow oxide. I shall follow with some close ups.
 Yellow oxide.
 Buff
Buff Earth Blend turf as the final blending agent.
 Voila!!
 Blending in a bridge.
 Using a small forest as a connector for a gap in the road.
 Some buff, just to make the passage more obvious.
 I am done with terrains for a while.......
13 September 2009
Terrain Table: Enfin
It has been some time since I have posted, so I thought I needed to update the blog before we all lose interest. I have been busy working on the relentless task of painting five battalions of Victrix French, but more about that later.
I have also been working on my terrain table. I have got the oak side pieces fastened in place and now the table certainly has a finished look. Additionally, the modules are all nice and tight in place.
I have build six 2x4' pieces and five 1x4' pieces as outlined below: Brown hills, grey roads and blue rivers. The roads were quite a challenge as the pieces are not geomorphic, so there was no easy way except by trial and error to arrange the positioning of the roads. It was, in fact, quite a nightmare. I think if I was going to do it again I would have liked to have used uniform sized terrain modules, but of course that was impossible as the largest table I could fit in was 12x5'. 12x6' would have been perfect as each module could have been 3x3'. Smarter fellows (Garage-Gamer), than me have already worked this out. C'est la vie!!
 Not withstanding the above, I was able to come up with several layouts. Here was my first, it was designed for use for my FoB scenario Engagement at Ventosa.
 Do not mind the trees on the ridge, I had to find somewhere to place them.
 Here is another layout, fortunately the terrain went together better than my little diagrammes. You will notice that the stretch of road going from the bend in the river in module C is missing, I can't get everything done (but I am working on it)!!

 Forest used to link gap in road.

This layout went together pretty well.
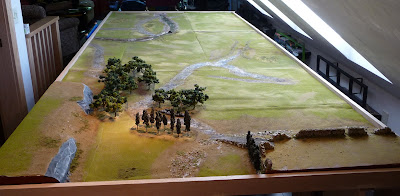
 Not withstanding the above, I was able to come up with several layouts. Here was my first, it was designed for use for my FoB scenario Engagement at Ventosa.
 Do not mind the trees on the ridge, I had to find somewhere to place them.
 Here is another layout, fortunately the terrain went together better than my little diagrammes. You will notice that the stretch of road going from the bend in the river in module C is missing, I can't get everything done (but I am working on it)!!
 Forest used to link gap in road.
This layout went together pretty well.

Overall, I am quite pleased with the table and the modules. There are quite a few possibilities for different scenario setups.
Time to get back to those Victrix French infantrymen......
(5834)
Terrain Table: Roads 1
I constructed my roads my using drywall compound as the base with fine sand and little stones as the relief. I then paint the road heavily with Burnt Umber, and then progressive dry brushes of Yellow Oxide and Buff. I then blend the road into the terrain using Earth Blend fine turf (Woodland Scenics®).
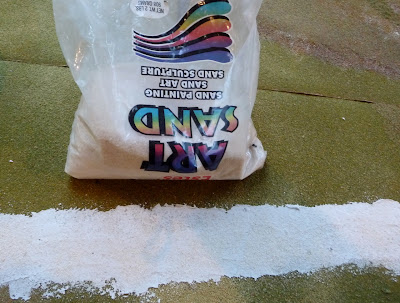
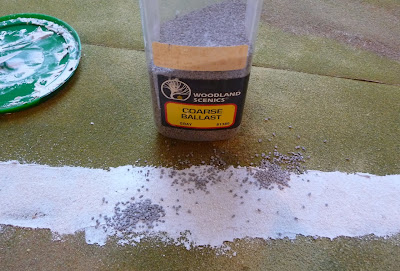
 More photos to come.....


 More photos to come.....
17 August 2009
Peninsular War: Anglo-Portuguese Army: The Third Division, May 1811
 This unit is comprised of figures which were my first attempt at painting 28 mm Napoleonics. I started these figures in the late spring of 2006. Looking back at the figures now, I can see my painting style was quite rudimentary, but I think fairly accurate in respect to the uniform details, aside from a few idiosyncrasies. The first figures I bought were Foundry which make up the majority of the figures in the 1st Brigade, as well as Major General Picton. My big purchase of Front Rank Figures came in January of 2007, and these can be seen in the 3rd Brigade. The 2nd Brigade is mixed. The 2 English brigadier generals and the Portuguese artillery (actually converted British) are from Redoubt, these were painted about a year ago. I really find Redoubt figures are no match in quality to Front Rank or Foundry. Artillery units are quite expensive, and I got these at 80% off.
I have recently moved the figures around so the rank and file in each battalion are from one manufacturer. A bit of repainting of facings and base repairs were required, but the figures are otherwise as painted at the time. Most of the British battalions at the Battle of Fuentes de Oñoro fielded a little over 500 men, so the figure ratio here is around 1 figure for every 40 men. I have not bothered with grenadier companies, but each battalion has their light company based a skirmishers (2 figures).
Sir Thomas Picton, as he would have appeared at the Battle of Waterloo, but who could resist.
 1st Brigade, led by Colonel Henry MacKinnon. The 74th Highland Foot was de-kilted by this time, but for some reason that escapes me now, I decided to dress the battalion colonel in full highland kit. Next is the 1st battalion of the 88th Foot, the famous Connaught Rangers. The last unit is the 45th (Nottinghamshire) Foot. The 60th Royal American Rifles had three companies assigned to this Brigade.
 2nd Brigade, led by Major-General Charles Colville. Leading the brigade are the 5th (Northumberland) Foot, followed by the 2nd battalion of the 83rd Foot and the 2nd battalion 88th Foot. The last battalion in the OB is 94th (The Scotch Brigade) Foot.
 5th Northumberland Fusiliers, painted in error as fusiliers: The Fighting Fifth did not receive this distinction until 1836. I am not sure why their regimental colours do not match the colour of their facings (gosling green)
 3rd Brigade led by Colonel Manly Power, here dressed as a Portuguese brigadier general. Here we have the 1st and 2nd battalion of the 9th line (Viana) regiment and the 1st battalion of the 21st line (Valanza) regiment, all in the Portuguese Northern Division. The command stand of the 1st/9 regiment was painted this weekend (I was short one stand)
 Portuguese Artillery, 4 batteries were at the battle, de Preto's and de Rozziere's of the 1st (Lisbon) Portuguese Artillery Regiment and de Sequerra's and Rosado's batteries of the 2nd (Algarve) Portuguese Artillery Regiment. each battery had five 9 pounders and one 5.5" howitzer by 1812 in Wellington's army. There were around 140 men in each battery, thus 3 figures on each stand.
 5th battalion, 60th Royal American Rifles, with slightly lighter green jackets then the 95th, red facings and nice blue trousers.

 1st Brigade, led by Colonel Henry MacKinnon. The 74th Highland Foot was de-kilted by this time, but for some reason that escapes me now, I decided to dress the battalion colonel in full highland kit. Next is the 1st battalion of the 88th Foot, the famous Connaught Rangers. The last unit is the 45th (Nottinghamshire) Foot. The 60th Royal American Rifles had three companies assigned to this Brigade.
 2nd Brigade, led by Major-General Charles Colville. Leading the brigade are the 5th (Northumberland) Foot, followed by the 2nd battalion of the 83rd Foot and the 2nd battalion 88th Foot. The last battalion in the OB is 94th (The Scotch Brigade) Foot.
 5th Northumberland Fusiliers, painted in error as fusiliers: The Fighting Fifth did not receive this distinction until 1836. I am not sure why their regimental colours do not match the colour of their facings (gosling green)
 3rd Brigade led by Colonel Manly Power, here dressed as a Portuguese brigadier general. Here we have the 1st and 2nd battalion of the 9th line (Viana) regiment and the 1st battalion of the 21st line (Valanza) regiment, all in the Portuguese Northern Division. The command stand of the 1st/9 regiment was painted this weekend (I was short one stand)
 Portuguese Artillery, 4 batteries were at the battle, de Preto's and de Rozziere's of the 1st (Lisbon) Portuguese Artillery Regiment and de Sequerra's and Rosado's batteries of the 2nd (Algarve) Portuguese Artillery Regiment. each battery had five 9 pounders and one 5.5" howitzer by 1812 in Wellington's army. There were around 140 men in each battery, thus 3 figures on each stand.
 5th battalion, 60th Royal American Rifles, with slightly lighter green jackets then the 95th, red facings and nice blue trousers.
13 August 2009
Photographing Miniatures: White Balance
I am not an intuitive photographer, at times I am not even sure what looks good. I use a Panasonic Lumix 10x optical zoom, 9 megapixal camera. It is nice and compact; but I feel the pictures, I take, could be better. I wonder if I could get some help with white balance. I am curious on what you think is the best setting. The halogen setting seems to capture the colour of the blue background most accurately, but I wonder if the green is right?
Below you can see my trial set up for photographing miniatures. I am using 2 lamps with 100w Daylight CFL bulbs. In the ceiling, there is a halogen spot aimed at the table. I think I need 1 more overhead light, but I am still trying to find something that is inexpensive.
 iA: This is the automatic setting on the camera.
 What follows are the manual settings (macro, no flash, spot focus, auto ISO), with variable white balance.
Average White Balance
 Daylight
 Halogen
 White Set (I am not sure what this means)
12 August 2009
Peninsular War: Anglo-Portuguese Army: The British Light Division, May 1811
The first of my peninsular units is the famous Light Division. They are represented here as they were at Battle of Fuentes de Oñoro. I probably painted these units 2 years ago. Only the 43rd (the Monmouthshire Light Regiment) and the 1/2 52nd (the Oxfordshire Light Regiment) battalions have colours. Neither, the Portuguese Caçadores or the 95th Rifles carried or I think had regimental colours.
The 52nd and the 43rd are based as in battalion order (3 figures to a base) while both the caçadores and the rifles are based in skirmishing order (2 figures to a base). The figures of the 52nd and 43rd are from Elite Miniatures and the Cacadores and the Rifles are from Front Rank. The flags are from GMB Flags.
 "Black Bob" Crauford, the general in command of the Light Division. These are Foundry figures.
 The 2nd Brigade, under Colonel George Drummond, comprising the 1/2 battalions of 52nd Light infantry regiment. The skirmishing units are elements of 1/95th Rifles and 1st Caçadores.
 Close up of the 52nd.
 Here is the first Brigade under Colonel Beckwith, late of the 95th Rifles. The brigade was made up of the 43rd Light infantry battalion, units of the 1/2 95th Rifles and the 3rd Caçadores.
 And of course, the Light Brigade's usual companion; the 1st KGL Hussars.

Subscribe to:
Posts (Atom)